Custom Search

Decoupage: Choosing your scissors


Decoupage Scissors

CHOOSING AND TAKING CARE OF YOUR SCISSORS


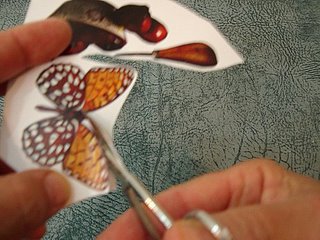
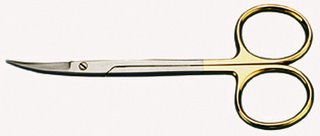
The more accurate you cut, the better your finished work will be. To achieve the best results you will need a small scissors with very sharp points and curved blades that feels comfortable to hold. A surgical scissors made for cutting the iris is ideal but a good cuticle scissors also works well provided both points are equally sharp. This type of scissors is available from surgical supply outlets, department stores, drug stores or craft supply shops that deal with decoupage. Never share your decoupage scissors with anyone as it moulds itself to your movements and when someone else uses it this gets thrown out of wack.

Decoupage: Mastering the art of cutting


How to cut out prints for doing decoupage.


MASTERING THE ART OF CUTTING
Beautifully cut prints will enhance the loveliness of your finished work. Poor cutting cannot be remedied so practice your cutting often. Try to cut every day. If you have nothing important to cut, try junk mail or magazine pictures. Start with simple designs and as you gain confidence tackle more difficult ones.


ORDER OF CUTTING
Cut out all the internal blank parts of the design first. This gives you more area to hold on to and allows more control. When cutting these inner bits cut in a clockwise direction. Start the cut by poking a hole through the middle of the area then insert the point of the scissors into the print from the back. The printed surface should be facing you, the scissors under the print.
When all the inner bits have been removed, cut around the outer edges working in an anti-clockwise direction.
When cutting delicate bits that would tend to bend and maybe even break off, it is a good idea to cut ?bridges? to help hold the cutting in shape until you are ready to paste it on your object. Draw them in with a dotted line before you begin the actual cutting. This helps you not to forget to cut in the bridge. You can use as many bridges as you feel comfortable with.
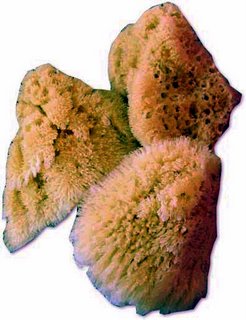
Cut away the bridges just before applying the paste or alternatively, and especially if the print is very fragile, apply the glue to the object, then place the dry cut print on the glued surface and gently wipe away the excess.glue with a damp sponge. It is a good idea to have about a dozen or so small pieces of sponge previously dampened and on hand when using this method. As you use each piece, put it into a container of water so the glue does not dry and spoil the sponge. At the end of the project wash the sponges

Decoupage tips ... laying out your design


DECOUPAGE TIPS ..... LAYING OUT YOUR DESIGN
When laying out your design it is helpful to draw the shape of your object
on a piece of paper so that you can arrange your prints before actually
gluing them to the object.
I use a spray-on adhesive to hold them in place temporarily. I spray it on
to the paper (the scrap paper I am using to plan the design on) and I
allow the adhesive to dry to the point that it is only slightly tacky. Just
tacky enough to hold my prints in place with a temporary bond. Your
spray on adhesive should have instructions on the label on how to create
a temporary bond. You do not need to be too precise with the layout,
but you should try to work to a theme of either colour or type
(for instance either Victorian, or hand painted flower prints, faces, Reds
with Grey, or Totally Pink etc,)
The prints can be overlapped if you wish. When planning a design for a
box, it sometimes looks nice to have the prints reach over the edges.
When placing a print that overlaps both the lid and the box, glue the whole
print across both pieces first with the lid shut and when the glued print is
completely dry, slit the print where the cover meets the box. That way you
will have a perfect match where the two pieces meet.
Another way to plan the design is to hold the pieces in place directly on t
he object with blue tac, then you can mark the outline of each cut piece
with dots made with a soft pencil or with chalk.
You can also mark the position by placing small pieces of blue tac at
particular points just outside the edge of the cut print to remind you where
it is going to go." ...

Decoupage: Gluing down the pictures


TECHNIQUES FOR GLUING DOWN THE PICTURES:
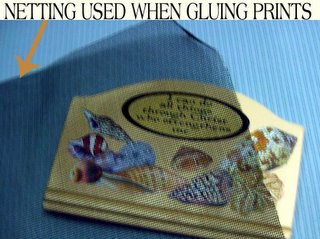
First make a Gluing Screen.
(See illustration above left.)

To make a gluing screen, you can use either a square of soft plastic window screen cut large enough to cover your entire project surface. You could also use nylon net, but with nylon net you will need to make it 2 or 4 layers thick, and stitch around the edges to hold the layers together. Using a screen over your print, and under your roller safeguards against the print getting damaged by the roller sticking to the print and pulling some of the printing ink off the paper and spoiling your picture. It also helps to get a very smooth bond by spreading the glue evenly under the print with little risk of damaging the print.

Sticking the prints down.
Using Decoupage Paste made according to the recipe below, Apply a generous amount to the back of your print. Take your time and allow the paper to soak up the glue. After the paper has soaked up enough glue to satisfy it's hunger, you must have enough excess to adhere to the item you are working on.

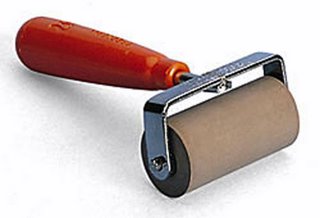
Place the glued print, glue side down on your project, and gently position it where you want it to be. Place the gluing screen over it and rub the print from centre to the edges (through the screen). When you are happy that there are no very large air bubbles remaining between the object and the print remove the gluing screen, take a damp sponge and gently remove any excess glue that has seeped out from under the print. Replace the screen and use a rubber roller and start rolling the print back and forth until it is absolutely and completely flat. Keep checking and rolling, check and roll. Do not rush this process as some paper tends to "pop up" if the glue has not taken hold properly. I usually roll my prints down for about a minute or more.

Prints may be layered one on top of the other to form your design. You can keep adding prints until you are happy with the results. This is where having lots of cut designs on hand is really good. That way you do not have to go back to cutting before completing your gluing session.

MAKING YOUR OWN DECOUPAGE PASTE
To make your own decoupage paste, used 3 parts of Clag Paste to 1 part of PVA glue which is the same as white glue, or Elners white glue.

MASTERING THE ART OF CUTTING
Beautifully cut prints will enhance the loveliness of your finished work. Poor cutting cannot be remedied so practice your cutting often. Try to cut every day. If you have nothing important to cut, try junk mail or magazine pictures. Start with simple designs and as you gain confidence tackle more difficult ones.

ORDER OF CUTTING
Cut out all the internal blank parts of the design first. This gives you more area to hold on to and allows more control. When cutting these inner bits cut in a clockwise direction. Start the cut by poking a hole through the middle of the area then insert the point of the scissors into the print from the back. The printed surface should be facing you, the scissors under the print.When all the inner bits have been removed, cut around the outer edges working in an anti-clockwise direction.
When cutting delicate bits that would tend to bend and maybe even break off, it is a good idea to cut “bridges” to help hold the cutting in shape until you are ready to paste it on your object. Draw them in with a dotted line before you begin the actual cutting. This helps you not to forget to cut in the bridge. You can use as many bridges as you feel comfortable with.
Cut away the bridges just before applying the paste or alternatively, and especially if the print is very fragile, apply the glue to the object, then place the dry cut print on the glued surface and gently wipe away the excess.glue with a damp sponge. It is a good idea to have about a dozen or so small pieces of sponge previously dampened and on hand when using this method. As you use each piece, put it into a container of water so the glue does not dry and spoil the sponge. At the end of the project wash the sponges out ready for the next project.

CHOOSING AND TAKING CARE OF YOUR SCISSORS
The more accurate you cut, the better your finished work will be. To achieve the best results you will need a small scissors with very sharp points and curved blades that feels comfortable to hold. A surgical scissors made for cutting the iris is ideal but a good cuticle scissors also works well provided both points are equally sharp. This type of scissors is available from surgical supply outlets, department stores, drug stores or craft supply shops that deal with decoupage. Never share your decoupage scissors with anyone as it moulds itself to your movements and when someone else uses it this gets thrown out of wack.


A brayer ... sometimes used to roll the prints flat after gluing.


USING SPONGES TO KEEP THE PROJECT CLEAN

Keep some damp sponges or damp rags handy for wiping off excess glue. Keep using fresh ones after you glue each piece down to avoid damaging your prints. You do not need to use sea sponged. Kitchen sponges will do just fine.

Decoupage : Colouring the cut edges


DECOUPAGE TECHNIQUES - COLOURING THE CUT EDGES OF YOUR PRINTS

Colouring the cut edges
After you have all the prints glued down and you are happy with the design there is one very important step to follow before you seal your prints. Check once more to see if any white cut edges are showing. For this step you will need a few soft coloured pencils or Chinagraph Pencil in muted shades, to match your prints and blend in with the background. Colours darker than the prints are best.

Take your object into an area where there is good light such as near a window, in the garden or under a good bright light. Now search with your eyes carefully for every little bit of white where the paper was cut and colour it in with a pencil that will match the design. If your prints are very diverse in colours you may need quite a few different pencils. If your prints are mostly dark you may get away with just using a black Chinagraph pencil.
Take time with this step as it will really improve the look of your finished item.

When you are finished working on it by the window. Take a rest and then take it to a different light source and check and colour again. At different times of the day, and in different lights different things show up ... so take your time. When you are happy with this step you can start sealing the prints.

Decoupage:Working with plastic


Plastic serving dish
To do decoupage on plastic, you need to sand back the plastic to give the surface a "tooth" to work on ... in other words, for the paint to adhere to. You will also need to apply at least one coat of Liquitex matt medium, and allow it to cure for a few days before commencing with your decoupage project. This will ensure that your background color paint sticks firm to the plastic object and does not start peeling off creating air bubbles below your design. After all, you are going to spend quite a bit of time making your special creation, you will not want it ruined simply because you were in too much of a hurry to get started.

While you are waiting for your background preparation to cure, you can use that time to cut your pictures and layout your design temporarilly on a piece of scrap paper ready to transfer to the object when it is quite well cured. Decoupage teaches you to be patient ... and you will find the time delay waiting to start applying the design well worth it in the end as your finished gift or personal decorator item will last for many years to come.

You can create many beautiful things from cheap "$2.00 SHOP" items. Apply Faux Paint Finishes and decoupage prints to make great looking antique, modern or vintage look items. These are so much fun to do!

You can also print your own pictures.
You can find lots of CD's with a variety of decoupage and craft prints right here and on my website.. http://artbyjean.org Just choose the one you like then print as many copies as you wish to make marvelous gifts and decoupage projects that reflect your creative instincts.

My craft prints can be used for tea bag folding,
decoupage, home decorating, scrapbooking and other paper craft. My designs include borders, tea bag tiles, decoupage prints, stripes, plaids, novelty signs, florals, fruit and vegetable designs, scrapbooking pages that you can print yourself from your PC or Mac, Various shapes in Tea Bag Tiles ... oval tiles, square tiles, round tiles, split tiles, flower tiles with 6 petals and flower tiles with 8 petals. Included on most of my CD's are circle templates that can be used to layout your medallions with 5, 6, 7, 8, 9, 10, or even more segments. These can also be used when doing decoupage to layout your prints evenly spaced in a circular pattern.

FIND PRINTS FOR THE FOLLOWING:
Tea bag tiles, Tea bag tiles on CD, decoupage prints, origami, decoupage prints on CD, scrapbook, scrapbooking, scrapbook albums, layout pages, pages, tiles to make medallions, card fronts, pretty background patterns, prints for decorating stuff, tea bag folding, cards, crafts, paper prints, decorate, decorative crafts, papers, cut outs, decorative butterflies, bows, carckle, backgrounds, stripes, plaids, flowers, oval tiles, square tiles, round tiles, flower tiles with 6 petals, flower tiles with 8 petals, folds, folding instructions, do it yourself projects, clipart, print them yourself, prints for do it yourself projects. circle layout pages for positioning your folded tea bag tiles, or your decoupage prints.WHAT YOU CAN DECORATE: Antique baths, art boxes, ash trays, bed heads, binder covers, book covers,book marks, bookends, bowls, boxes, broaches, BYO wine holders, candleboxes, candlesticks, canisters, CD racks, ceiling, ceramic bisque, chairs,chess boards, chest of drawers, chests, childs bench, childs furniturechocolate boxes, cigar boxes, clocks, coasters, collage, crash helmets,cupboard doors, cutlery boxes, decoys, dishes, document trays, doll furniture, dolls house furniture, dolls houses, door furniture doorstops,egg racks, fire screens, foot stools, frames, fruit bowls, fruit boxes,furniture, game boards, garden bulb storage boxes, greeting cards,hair clips, hand mirrors, hat boxes, home decorating projects, jewel boxes,journal covers, kids benches, kids furniture, lamps, lap desks, lazy susan, leg and arm casts, letter boxes, letter trays, magazine racks, matchboxes,old metronome, mirror frames, mobiles, mood indicators, music boxes,musical instruments, napkin holders, napkin rings, old irons, old kettles,old suitcases, old telephones, old tin buckets, paper mache objects,paper tole, paper weights, pedestals, pencil holders, pianos, picture frames,placemats, plant pots, framed prints, planters, plaques, plaster cast items,plastic dishes, plates, playing card boxes, recipe boxes, scrapbooks, screens, seed boxes, sewing boxes, shoe shine boxes, signs,skate boards, soap boxes, soaps, special invitations, stamp boxes, stones,stools, switch plates, table tops, coffee tables, the refrigerator,tissue box covers, toilet seats, tool boxes, trays, trivets, trunks, vases,walking canes, waste baskets, shoes, welcome signs, wind barrels,wood floor, concrete floor, wood ironing boards, old saws, personal invitations, greeting cards, notepaper, homepreserve jars, plant pots, church bulletins, church notices, announcements,invitations, blackboards, old unusable CD's, picture frames, IN and OUT trays, precious paintbrush handles, and the list goes on ....
Decoupage: Working on plastic

Decoupage: Working with plastic.

This is a cheap flea market plastic tray.
It is quite sturdy, with sharp edges and structural lines.
I used three different large tile prints to decorate this item,
then varnished with clear water based varnish ... Royal Coat by Plaid.

The plastic was first sanded back to give the item a bit of a tooth so the paint would adher properly.
I then applied a coat of Liquited Matt Medium as a base coat and allowed that to cure for a couple of days before commencing with applying the background colour. For the very dark almost black color, I used burnt umber and pthalo blue mixed on the actual item as I brushed them on. I put a bit of each on the brush and used very loose brush stroked to create the almost black look. I used more of the burnt umber than I did blue. When I was happy with the background colour, I applied the square tiles using "Royal Coat" by Plaid as the decoupage paste, and then varnished with Royal Coat.

It is hard to believe it is plastic as the decoupage gives it a deep luxirous glow.

You can find lots of decoupage and craft print on CD's right here and on my website..
http://artbyjean.org
My craft prints can be used for tea bag folding, decoupage, home decorating, scrapbooking and other paper craft. My designs include borders, tea bag tiles, decoupage prints, stripes, plaids, novelty signs, florals, fruit and vegetable designs, scrapbooking pages that you can print yourself from your PC or Mac, Various shapes in Tea Bag Tiles ... oval tiles, square tiles, round tiles, split tiles, flower tiles with 6 petals and flower tiles with 8 petals. Included on most of my CD's are circle templates that can be used to layout your medallions with 5, 6, 7, 8, 9, 10, or even more segments. These can also be used when doing decoupage to layout your prints evenly spaced in a circular pattern.

For ideas and inspiration on what to decorate refer to the extensive list in the sidebar.

Decoupage:Working with wood

Decoupage: Working with timber,

This very large Sacred Heart of Jesus picture was decoupaged about 30 years ago.
This is a recent photograph, The colours have kept beautifully.
I did make one very big mistake though. The back of the timber was not sealed ...
The result is that the project has warped and is now concave.
Although concave, the beauty is still there and most people actually like the effect.
The size is about two feet wide by three feet high.

You can find lots of decoupage and craft print on CD's right here and on my website

Decoupage Glue

Decoupage Glue
white glue
warm water

Combine 3 parts glue with 1 part water. Mix thoroughly. Store in air-tight container.